Pavlova (Pav) is a meringue cake that has a light and delicate crisp crust and a soft sweet marshmallow center. This lovely dessert is typically served with softly whipped cream and fresh fruit. There is a long standing debate about whether New Zealand or Australia invented this dessert, which has yet to be resolved. What we do know is that the name, Pavlova, was chosen in honor of the Russian ballerina, Anna Pavlova, who toured both New Zealand and Australia in 1926.I have always loved baked meringue, so the urge to make this finally hit home. Would you believe I've never made it before? This was my very first attempt. I carefully read the reviews on Ina Garten's version, and people were quite harsh. Many complained that the temperature was wrong, and that the meringue never baked. I read the directions a few times and decided to dive in and give this a go. As always, let me show you:
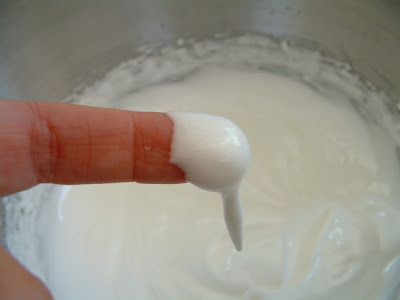
In the bowl of your electric mixer, with the whisk attachment, beat the egg whites on medium-high speed until they hold soft peaks. Start adding the sugar, a tablespoon at a time, and continue to beat until the meringue holds very stiff peaks. TIP: You want your bowl and whisk beater to be very clean. I wipe the bowl with a paper towel and a little white wine vinegar. That way, I'm pretty much guaranteed that my egg whites will turn out just right.
Test to see if the sugar is fully dissolved by rubbing a little of the meringue between your thumb and index finger. The meringue should feel smooth, not gritty. If it feels gritty the sugar has not fully dissolved so keep beating until it feels smooth between your fingers...
Sprinkle the vinegar and cornstarch over the top of the meringue and, with a rubber spatula, fold in...
Gently spread the meringue inside the circle drawn on the parchment paper, smoothing the edges.
Bake for 1 hour 15 minutes or until the outside is dry and takes on a very pale cream color. Turn the oven off, leave the door slightly ajar, and let the meringue cool completely in the oven. This step is very important! The parchment paper easily removes from the meringue-- don't forget to do that, too.
This was attempt #1. I wasn't happy with the shape...
(The outside of the meringue will feel firm to the touch, if gently pressed, but as it cools you will get a little cracking and you will see that the inside is soft and marshmallowy.) At this point, the cooled meringue can be made and stored in a cool dry place, in an airtight container, for a few days. That's exactly what I did!
NOTE: This was my first attempt. I thought it was a little challenging to form "edges". The second time I made this, I ended up piping the meringue, which I found a bit easier.
Because there are gorgeous raspberries, in season, I made a raspberry coulis sauce. If you'd like to see a tutorial on how I make a coulis sauce, please click here.
Just before serving gently place the meringue onto a serving plate. Whip the cream in your electric mixer, with the whisk attachment, until soft peaks form. Sweeten with the sugar and vanilla (I add a Dr. Oetker product that helps the whipped cream to hold longer). I used olallieberries, raspberries and fresh blueberries.
...and then mound the softly whipped cream into the center of the meringue.I don't know about you, but I'm drooling again. Whipped cream is one of my greatest weaknesses. Help me!
Arrange the fruit randomly, or in a decorative pattern, on top of the cream..
(This is my second attempt. I was much happier with the shape)
(This is my second attempt. I was much happier with the shape)
If desired, drizzle a raspberry coulis sauce over each serving. (Nods head, enthusiastically...)
It's time to cut the first slice...
Can you see that chewy, marshmallowy center? Oh my...
VERDICT: Having followed the directions, implicitly, the meringue was a total success. There are a lot of different textures going on here-- a slight crunch of the meringue crust... the chewy center... the silkiness of the whipped cream... the summer bursts of fresh berries. For the final ta-da, the raspberry coulis sauce rounds off this impressive dessert perfectly. This really isn't a heavy dessert. The next time, I plan to make individual meringues by piping the fluffy egg white mixture. That way I can fill each meringue with whipped cream. I have visions of filling the meringue with my Lemon Curd Ice Cream Custard. Keeper!
I need to buy more berries, before the season in my little part of California is over. I hope that you give this a try. It's sure to impress your guests-- or even yourself!
Enjoy!


0 comments:
Post a Comment