I stock up on English Muffins, when they are on sale and freeze them. Then, the unthinkable happened. One Monday morning, I sleepily reached for a muffin. Empty. Nothing. I checked the freezer, and the familiar plastic bag wasn't there. Nooooooo! The drive to work, just wasn't the same for me, as I sipped my coffee and made a mental note to stock up, after work.
Necessity is the Mother of Invention, so during my break, I decided to do a little research on how to make my own English Muffins. I found a recipe on "Baking Bites". That evening, I measured out the water, sugar and yeast.
Then, I unpacked the English Muffin Tins I had purchased some time ago-- with the intention of learning how to make English Muffins. NOTE: You don't have to own muffin tins. I've heard that people make them out of foil-- or the dough is supposed to be thick enough that you can do this "free form".
This is a plastic bucket with a lid, that I use a lot for making bread. A glass bowl and plastic wrap works just as well. To the sugar and yeast, I add warm water (at about 110F) and stir it; set it aside for 5-10 minutes until it becomes bubbly and alive.
Turn on the oven to WARM for 2-3 minutes and then turn it off. This is my way of speeding up the proofing process.
See this cool little tool? It's a Danish Dough Whisk, and this has become a handy little tool. It makes mixing bread dough a breeze.
It's been less than ten minutes, and I've measured out flour, raisins, cinnamon and I'm warming up some 1% milk to about 110F. The yeast is nice and foamy...
I've dumped in the flour and cinnamon, and now I add the warm milk...
...and mix the dough together until smooth.
This is effortless, I tell ya! The dough is wet, almost like a very thick pancake batter.
Add the raisins, and give the batter a good stir.
Cover the dough and let it rise. I placed mine in my warm and snug oven.
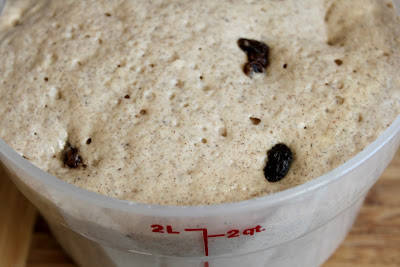
45 minutes later, we have English Muffin Batter!
The English Muffins are actually cooked, rather than baked. I used my cast iron griddle, that I very lightly sprayed with baking non-stick spray. I set the heat at medium-high. If you don't have a griddle you can certainly use a skillet.
I also sprayed the muffin tins with non-stick spray. So, this is very much liking making thick pancakes. I've made this recipe, twice, and found that 1/2 cup of dough worked out best. These do puff up a bit...
You will actually notice a bit of bubbles, which is a sign that it's time to flip the muffins over-- this took about 2-3 minutes. It all depends on your stove and skillet/griddle.
A couple of tricks that I learned, is that I used a small spatula to spread the batter evenly (if you're using tins). Otherwise, you can certainly make these "free-form" and use a spatula to shape them. If you're using muffin tins, they get hot (and I am speaking from personal experience), so having a towel to grab them helps. Just like making pancakes, I slipped a spatula underneath the muffin, said a prayer and....
The first once was a little messy, and borderline burned. That's why I suggest starting at a medium heat until you get to know your griddle.
I finally got the hang of it. Total cooking time was about five minutes per muffin.
The tins slip off pretty easily, so I could check if they were properly cooked.
I do recommend that you test one of the thicker ones. I didn't do that the first time, and I ended up with a couple of raw muffins. Not good.
See? It's not ready yet. You want a toothpick to come out clean. I let these cook for another minute, and they were done.
From start to finish, I had homemade Cinnamon-Raisin English Muffins in one hour! How fun!
I had to wait about 10-15 for these to cool.
The moment of truth, as I split one open with a fork.
I know one thing, for certain. I will never run out of Cinnamon-Raisin Muffins again!
I packed up the muffins for the next morning...
I toasted a muffin, and made my cup of coffee...
...and added honey to it. All was right with the world, again.
TASTING NOTES: Delicious! It has just the right balance of cinnamon. It's so easy, that you don't even need to use a stand mixer. These are just as good-- if not a wee bit better-- than the commercial ones that I pay up to $4.00 a package for. The biggest difference, though, is that these need to be frozen, if you don't eat them in a matter of a day or two. Otherwise, they will begin to mold (also spoken from experience, after the first batch). You see, there are no preservatives.
I'm so glad that I finally learned how to make English Muffins. They're less scarey and complicated than I thought. Next, I'll work on a Whole Wheat version. I hope that you give this a try, yourself. Breakfast is an important way to start the day, and these would be a great way to do it.
A printable recipe card is at the very end of this post. If you have trouble viewing it, click here to see it.
Enjoy,
Debby


0 comments:
Post a Comment